This Website is Pedal-Powered
This website is 100% human-powered. I use a pedal-powered computer in my home office; the excess electricity I generate each day while working is stored in a storage battery built into the desk. This battery powers this website's web server and the modem connecting it to the internet when I am not pedaling. You can find details on how the system is set up here.

The battery icon in the header of every page on this site displays the current state-of-charge of the battery. If the icon is green, I'm currently charging the battery. If it's red, I'm not. The icon is updated every 10 minutes.
I got the idea to do this from an article Kris De Decker wrote about how he uses solar power to power his Low Tech Magazine website. One difference between Kris's setup and mine is that my origin server is entirely off-the-grid, while Kris depends on a grid-powered router.
Pedaling Time
The biggest challenge to operating a human-powered website is generating enough electricity each day to keep the site up. The energy stored when pedaling must be sufficient to keep the web server and modem up for the remainder of the day. Assume S is the surplus power generated while pedaling, L the power the web server and network equipment consumes when not pedaling, e is the storage efficiency of the battery, and t is the number of hours spent pedaling each day. Then:
energy stored when pedaling = energy consumed when not pedaling
                  S x e x t = L x (24 - t)
            (S x e + L) x t = 24 x L
                          t = 24 x L / (S x e + L)
My web server and modem draw 6 W combined, and my LiFePO4 battery is about 95% efficient at storing electricity. When I'm working on my computer, I generate, on average, 33 W more than my load requires. Then the amount I need to pedal each day to keep this server up is:
t = 24 x 6 / (33 x 0.95 + 6) = 3.86 hours
Since I currently work on my computer about 4 hours a day on average, this has yet [1] to be a problem.
Cloudflare
This website uses Cloudflare for a CDN, meaning much of the content you see is cached and served from their servers, not mine. There are several reasons I made this decision:
- We have slow internet service (12 Mbs down / 0.8 Mbs up). Most people would find the experience of visiting this site painfully slow if all content always came from my origin server--especially pages like this one with several images.
- Despite my best efforts, I'm not always able to keep my server up. For those few times when my server goes down, Cloudflare will continue to serve the content from its cache.
- My little server and slow internet connection are vulnerable to a DDoS attack and slashdotting when it's featured on major sites. With Cloudflare handling incoming requests, such a rush of traffic is unlikely to take my site down.
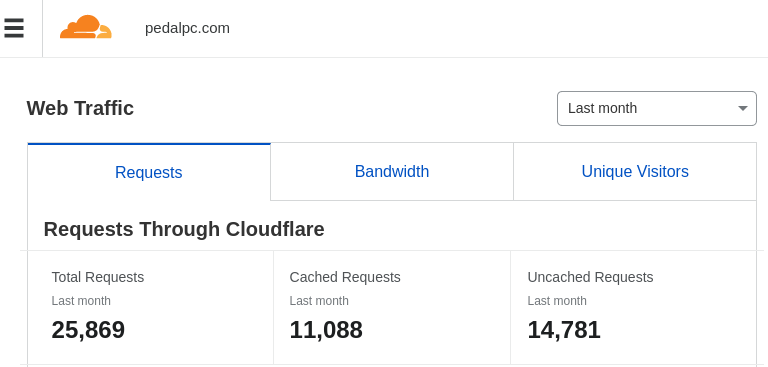
Some might consider this cheating, but in a typical month Cloudflare, fills less than half of requests to my site from its cache. The majority still hit my server.
Software
For security and peformance reasons, all the pages on this site are static (i.e., individual HTML files stored on my server, not generated from a database). The only dynamic content are the graphs on the "About" page that shows how much electricity I've generated each day over the past 10 years (updated once a day using a bash script), and the battery state-of-charge SVG icon in the header of every page (regenerated every few minutes using a Python script by measuring the battery voltage and coulomb counting with a microcontroller.) The site is served using Nginx.
What follows is the procedure I followed to set up this website. I'm including it for those wanting to host a publicly-available, static website from their home server, pedal-powered or not. (I'm also including it so I know how to rebuild the site in the future if necessary!) The procedure assumes:
- you have static content ready to host,
- you have a residential internet connection with a dynamic IP address,
- your ISP does not block port 443,
- you have a domain name,
- you have created an account for your domain with Cloudflare, and
- your server runs some flavor of Debian or Ubuntu Linux.
For security, all requests (except local LAN traffic) will pass through Cloudflare over a secure connection using port 443.
Here are the steps:
- install and configure Nginx
- install and configure Uncomplicated Firewall (UFW) for added protection in case your router's firewall is breached or misconfigured
- configure Cloudflare for your site
- change your router settings to only permit outside traffic from Cloudflare
- install a bash script to dynamically update Cloudflare's DNS records whenever your outside IP address changes
- check your logs to make sure everything is working OK
Setup Nginx
Install Nginx:
$ sudo apt-get install nginx
Create a Nginx configuration file for your site in the /etc/nginx/sites-enabled/ directory. (Note that since this directory is owned by root, so you will need to edit it using sudo.) Here's what my file looks like. Customize it as necessary using your own settings and domain name:
$ cat /etc/nginx/sites-enabled/mysite.conf
# set default caching behavior
# https://blog.skbali.com/2019/02/add-expires-headers-to-your-nginx-configuration/
# https://nginx.org/en/docs/http/ngx_http_headers_module.html#expires
#
map $sent_http_content_type $expires {
    default		1d;
    text/html	1d;
    text/css	3M;
    application/javascript	3M;
    ~image/         3M;
}
expires $expires;
add_header Cache-Control "public";

# redirect non-https to https
# (this _should_ never happen since port 80 will be blocked, but I've added
# it just for completeness)
server {
    listen 80;
    listen [::]:80;
    server_name _;
    return 301 https://$host$request_uri;
}

# redirect domain.com to www.domain.com
# this is necessary to fix css/js cross-domain errors
# e.g., when css comes from www.mysite.com/mysite.css
# and improve website rank in search engines by removing duplicated content

server {
    listen 443 ssl;
    listen [::]:443 ssl;
    server_name mysite.com;
    # https://www.nginx.com/resources/wiki/start/topics/tutorials/config_pitfalls/#taxing-rewrites
    return 301 https://www.mysite.com$request_uri;
}

# content gets delivered here
server {
    # SSL configuration
    #
    listen 443 ssl default_server;
    listen [::]:443 ssl default_server;

    # These certificates are necessary when Cloudflare's SSL/TLS
    # encryption mode is set to "Full(Strict)"
    ssl_certificate /etc/ssl/certs/cloudflare_mysite.com.pem;
    ssl_certificate_key /etc/ssl/private/cloudflare_mysite.com.key;
    ssl_protocols TLSv1.2 TLSv1.3 TLSv1.1 TLSv1;

    # This certificate is used in Authenticated Origin Pulls
    ssl_client_certificate /etc/nginx/certs/cloudflare.crt;
    ssl_verify_client on;

    # location on your server where your static files are stored
    root /var/www/mysite.com

    # Add index.php to the list if you are using PHP
    index index.html;

    server_name www.mysite.com;

    # 301 redirects for pages from old site, if you have any
    #rewrite ^/old/ur1/1 /new/url/1 permanent;
    #rewrite ^/old/ur2/2 /new/url/2 permanent;

    # set short expiry for pages with frequent changes
    location /about/index.html {
        expires 1h;
    }
    location /images/battery-status.svg {
        expires 10m;
    }

    location / {
        # First attempt to serve request as file, then
        # as directory, then fall back to displaying a 404.
        try_files $uri $uri/ =404;
    }

    ## Uncomment the following if running any PHP scripts
    # pass PHP scripts to FastCGI server
    #
    #location ~ \.php$ {
    #	include snippets/fastcgi-php.conf;
    #
    #	# With php-fpm (or other unix sockets):
    #	fastcgi_pass unix:/run/php/php7.3-fpm.sock;
    #	# With php-cgi (or other tcp sockets):
    #	fastcgi_pass 127.0.0.1:9000;
    #}

}
enable the server for this site:
$ sudo ln -s /etc/nginx/sites-available/mysite.conf /etc/nginx/sites-enabled/mysite.conf
Start Nginx:
$ sudo service nginx start
Set Up UFW
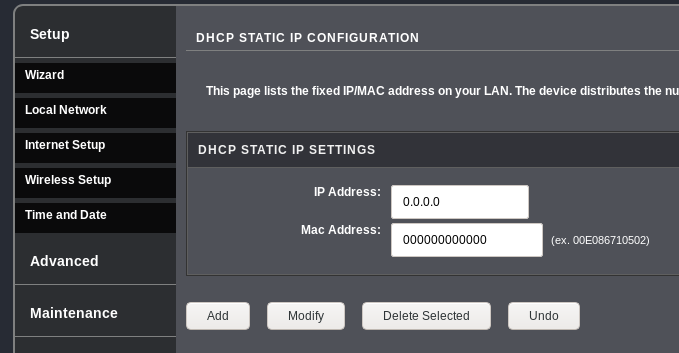
Set static IP address for your web server
Your web server will need a static IP address to route traffic to it. If you have not assigned it a static IP already, go to your router's settings and change how your server's IP address is assigned from 'DHCP' to 'static'. On my router, this is under Setup > Local Network > DHCP Reserved:
 >
>
Write down the IP address you choose. You will need it future steps.
Install and configure UFW
Install Uncomplicated Firewall (UFW) on your server:
$ sudo apt-get install ufw
Add default rules and the IP address range of your LAN, so you can access it from any computer on your network. (Note that your network's IP range might be different from 192.168.0.1):
$ sudo ufw default deny incoming
$ sudo ufw default allow outgoing
$ sudo ufw allow from 192.168.0.1/24
Then add all the IP addresses and ranges from Cloudflare's IP list.) Replace '###.###.###.###' with your server's static IP:
$ sudo ufw allow from 173.245.48.0/20 to ###.###.###.### port 443
$ sudo ufw allow from 103.21.244.0/22 to ###.###.###.### port 443
$ sudo ufw allow from 103.22.200.0/22 to ###.###.###.### port 443
$ sudo ufw allow from 103.31.4.0/22 to ###.###.###.### port 443
$ sudo ufw allow from 141.101.64.0/18 to ###.###.###.### port 443
$ sudo ufw allow from 141.101.64.0/18 to ###.###.###.### port 443
$ sudo ufw allow from 108.162.192.0/18 to ###.###.###.### port 443
$ sudo ufw allow from 190.93.240.0/20 to ###.###.###.### port 443
$ sudo ufw allow from 188.114.96.0/20 to ###.###.###.### port 443
$ sudo ufw allow from 197.234.240.0/22 to ###.###.###.### port 443
$ sudo ufw allow from 198.41.128.0/17 to ###.###.###.### port 443
$ sudo ufw allow from 162.158.0.0/15 to ###.###.###.### port 443
$ sudo ufw allow from 104.16.0.0/12 to ###.###.###.### port 443
$ sudo ufw allow from 172.64.0.0/13 to ###.###.###.### port 443
$ sudo ufw allow from 131.0.72.0/22 to ###.###.###.### port 443
Check to make sure all the rules are correct, then start the firewall:
$ sudo ufw show added
$ sudo ufw enable
Set up Cloudflare
Set Up DNS
Get your network's current public IP address (i.e., the address your ISP has dynamically assigned to you). You can find this from websites like whatismyip.com or www.iplocation.net, or use the command line:
$ dig +short myip.opendns.com @resolver1.opendns.com
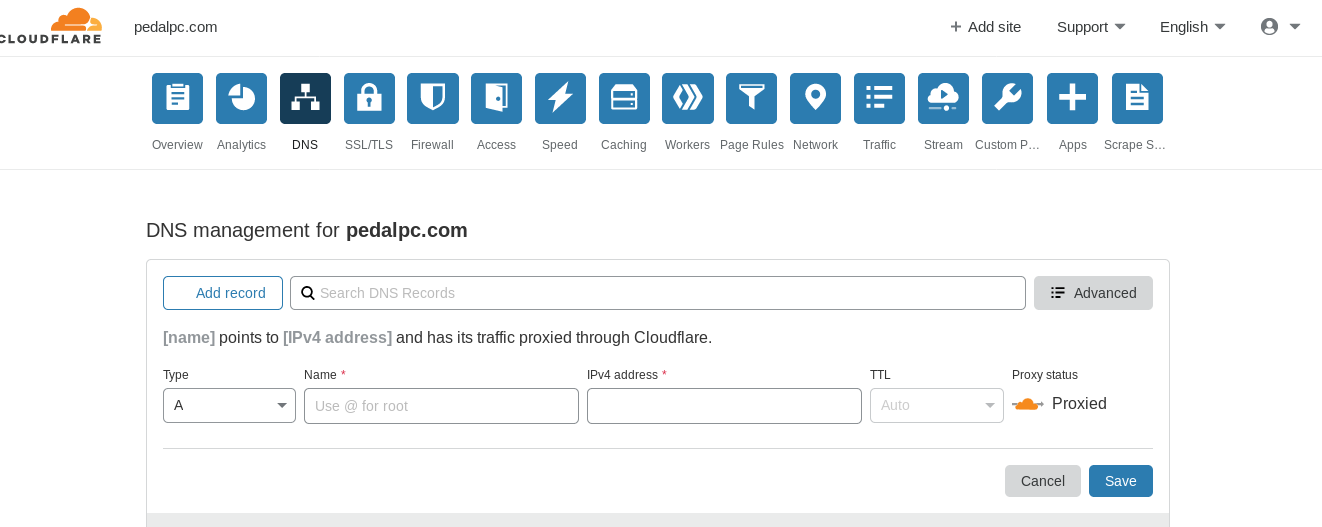
Login to your Cloudflare account and go the DNS section of your dashboard. Add one "A" record for your root domain (e.g., "mysite.com") for your current public IP address, then add a "CNAME" record for your "www" subdomain with your root domain as the target.
Finally, if you purchased your domain name from a registrar other than Cloudflare, log into your account at your registrar and update the nameservers to those shown near the bottom of your Cloudflare DNS dashboard

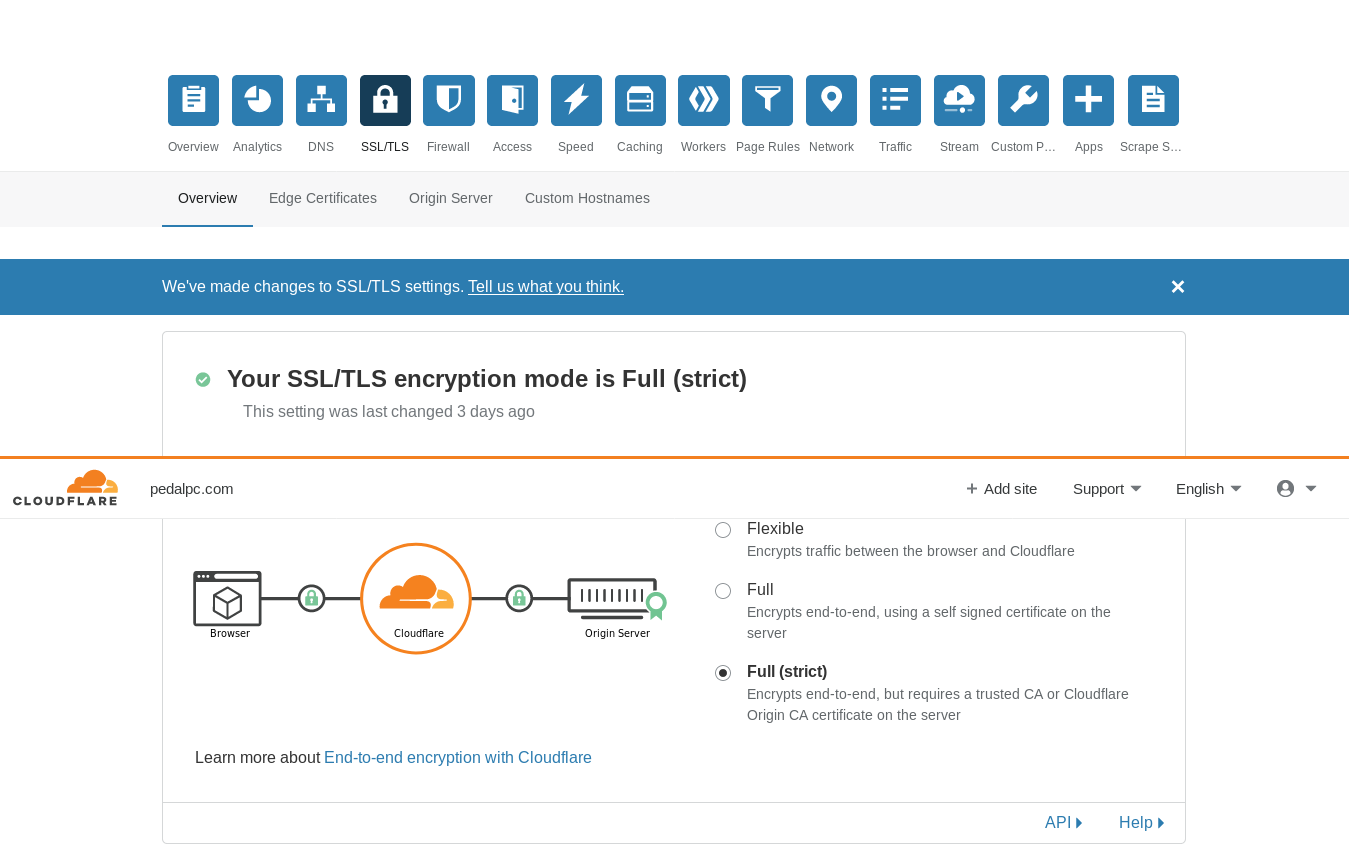
Configure SSL
Go to the SSL/TLS portion of your Cloudflare dashboard and set the encryption mode to "Full (strict)".
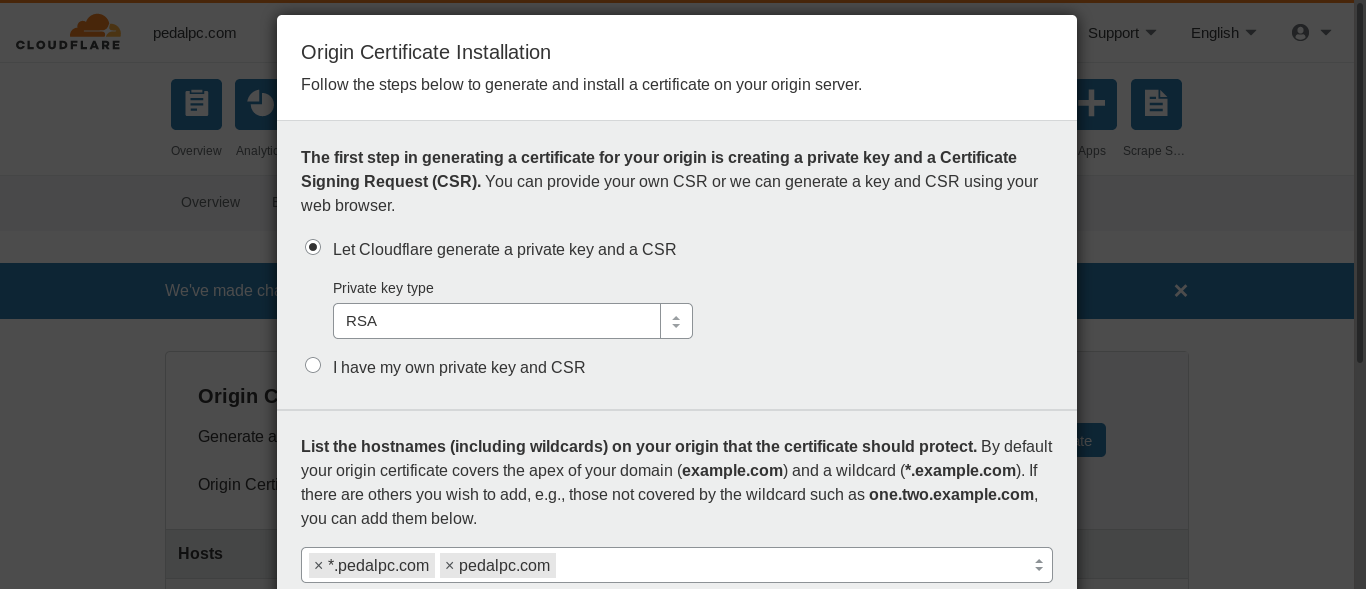
Then choose the "Origin Server" section:
Create a new certificate with either an RSA or ECDSA private key:
 ">
">
Once the certficate is generated, copy the contents of the origin certificate box into a new file on your server under /etc/ssl/certs/. Note that the filename must match the ssl_certficate value in your /etc/nginx/sites-available/<SITE_NAME>.conf file. Here's what a public key certificate file look like:
$ cat /etc/ssl/certs/cloudflare_mysite.com.pem
-----BEGIN CERTIFICATE-----
MIIEojCCA4qgAwIBAgIUBIfvLqnjTKzAiEDBo45W8J7WmWIwDQYJKoZIhvcNAQEL
BQAwgYsxCzAJBgNVBAYTAlVTMRkwFwYDVQQKExBDbG91ZEZsYXJlLCBJbmMuMTQw
MgYDVQQLEytDbG91ZEZsYXJlIE9yaWdpbiBTU0wgQ2VydGlmaWNhdGUgQXV0aG9y
aXR5MRYwFAYDVQQHEw1TYW4gRnJhbmNpc2NvMRMwEQYDVQQIEwpDYWxpZm9ybmlh
MB4XDTE5MTEyMjEyMzYwMFoXDTM0MTExODEyMzYwMFowYjEZMBcGA1UEChMQQ2xv
dWRGbGFyZSwgSW5jLjEdMBsGA1UECxMUQ2xvdWRGbGFyZSBPcmlnaW4gQ0ExJjAk
BgNVBAMTHUNsb3VkRmxhcmUgT3JpZ2luIENlcnRpZmljYXRlMIIBIjANBgkqhkiG
9w0BAQEFAAOCAQ8AMIIBCgKCAQEAt65S36VyqoBvl4g/0dmyzNFuUmTjkw45V2kX
enBXPazYnPOjRIzmmWlEDSlUaBzodzQ15LQxNVrU3/efBSAt2qkoSzLCLwVrgdl6
iM71RZURmvayT10p2snh9OfUXrrC5IMTch99RhFWNN5D/ZHiXgq+HYCAn4SDpbP2
H43gCI+wW1B7xg8TTifXu4MeLvdrpQTS6btQRaHRi0U39fUyrirNsKV7Ru1ElycW
kWwfw370fIe2YziWaRIcwsq7qfaR+ugu7sovRxe0MKs9gqhtmY/ixfB/TVSsWefM
EvDy0xHvRuJS4Yif/GeZ/rE/kFtuQBr4BjUQNGKyMb1ZEwOvAwIDAQABo4IBJDCC
ASAwDgYDVR0PAQH/BAQDAgWgMB0GA1UdJQQWMBQGCCsGAQUFBwMCBggrBgEFBQcD
ATAMBgNVHRMBAf8EAjAAMB0GA1UdDgQWBBTlVP9jLBNmzIlj3JjBohZUq61gDzAf
BgNVHSMEGDAWgBQk6FNXXXw0QIep65TbuuEWePwppDBABggrBgEFBQcBAQQ0MDIw
MAYIKwYBBQUHMAGGJGh0dHA6Ly9vY3NwLmNsb3VkZmxhcmUuY29tL29yaWdpbl9j
YTAlBgNVHREEHjAcgg0qLnBlZGFscGMuY29tggtwZWRhbHBjLmNvbTA4BgNVHR8E
MTAvMC2gK6AphidodHRwOi8vY3JsLmNsb3VkZmxhcmUuY29tL29yaWdpbl9jYS5j
cmwwDQYJKoZIhvcNAQELBQADggEBAJan1Kdb1to7Nl5FmhmrJXBNALBMppp0uoAI
+ftXRKrGTuYT6gN7ueBZN4xFok8ndGqBvHk4odo08suJQPGfgoDkx5VF3O7rbG8H
XiKSayy6K8AqQhv1s78Ut6NbOCEfCo0kmoCyTmvC2UvPKKqLapKpb53X5HTO201s
Y9O9JDgL36BSvWvN3vIU0/xd562AMpTfQrPELUp42XBAjNJeh/qPLOE8+H1/NBSo
YRiuTdSeeCjdKv/KIFWmXNbZWeby2ECtRUwN+ukyvvw0NYYVbGtB3ic6WEi5GIqN
XOBM0pg5ils/Zl+xqOuXn0uxb3NuYa5DL4MNk/nzlHWbMJt2kCI=
-----END CERTIFICATE-----
Copy the contents of the private key dialog box into another file on your server in the /etc/ssl/private/ directory to hold the private key. The filename must match the ssl_certficate_key value you provided in /etc/nginx/sites-available/mysite.conf. Here's an example private key file (no, it's not the one I am using!):
$ cat ssl_certificate_key /etc/ssl/private/cloudflare_mysite.com.key
-----BEGIN PRIVATE KEY-----
MIIEvAIBADANBgkqhkiG9w0BAQEFAASCBKYwggSiAgEAAoIBAQC3rlLfpXKqgG+X
iD/R2bLM0W5SZOOTDjlXaRd6cFc9rNic86NEjOaZaUQNKVRoHOh3NDXktDE1WtTf
958FIC3aqShLMsIvBWuB2XqIzvVFlRGa9rJPXSnayeH059ReusLkgxNyH31GEVY0
3kP9keJeCr4dgICfhIOls/YfjeAIj7BbUHvGDxNOJ9e7gx4u92ulBNLpu1BFodGL
RTf19TKuKs2wpXtG7USXJxaRbB/DfvR8h7ZjOJZpEhzCyrup9pH66C7uyi9HF7Qw
qz2CqG2Zj+LF8H9NVKxZ58wS8PLTEe9G4lLhiJ/8Z5n+sT+QW25AGvgGNRA0YrIx
vVkTA68DAgMBAAECggEAPY8C30lHoLTisVpMaTwYnGQkISEG1CYUOaNS5wn3cwgW
oKNWuIawUgHheLe9PhdSIYEx/rAVPdhvN5B5jvI16+59PpaIVdHvMdl9I5SYxvUq
rVC4ebizakv2mmmH1yeoYYU8YycCiRUOWzGSf80AnJvlE2YZtVxn8oTZm8Gkr7lG
znCOltQnsObeGc32M/69CH3vhxByanLNm05EWk/kDw+i6SZW8PvSSnJPlslDo8s/
F6V2vDRp4AOpr/E5r52oFS+ejzN//JRjXtEAiOmt7i2mDqdDd3FGdxJgeCJKHhxj
tzMji2LuGU+cqOpwAjgP48KndDocfihesFddkhClQQKBgQDj2+D8hiBCYUTk5Rgt
rRL6Q6vgd8qdww7h6lSL9ce0pealEY+gzx6zRSE2p7EC7501cx6K/Ss/7CERRYoG
5wbK1c3LDCOwlAHCBOyyLHkvD63IAKrcIVXLw4sJZftUm+Pw9zD4oCRZynd+IUuz
VX1YGJze/MMkBnnNAfX3ttxEewKBgQDOXbBV/ySudaUX2O9AfMyzT/g06oEdPXdh
x97puJxI2V5KXczjqQ3LkjbNw614hTKCEYQ6n998A3lY1t9XRmro0b8zdYgPdYpo
XcPd4aan87gwWlpb/ttsKzc8PGHk47KQeaprqZvsWicNi7nUQL2021RhaCmCt8Kb
45MwNDhNGQKBgAPxVA1KjNhZMoX7aNWxfviRnzG9IOZl76X9FgVt9Uys6jbE/QU9
UDyt34tAj5GLb97y5P5mrw7mGRRhbaf862MrG+p9hUiS5wziZO4YUuh7jvg8+rfg
Y8mo0okRGK44HFOZE2HZ84cSN8sY7GRoAEk788rv+Lhw3D6t4AGvSlRtAoGABcMr
91rGhXCXiZDvLVfOx3sGLUQXEt/yg3J3UQNsqcQYE++GlxzTW8nbaed64pCllmgy
zwhDz0yxiL+HQQKgXZvtwNwZToUztjJYE8wHQU1W6VK8jzEQo3aZdj8hZKjPBaXA
En2L8w+ZY5FxQPIF2hT9yDKGZjYHYx75rzDmGZECgYAs/EIDUtgtte3UpE6ARBUb
pI4KV09hXXP1WqxBnvKBHKqRc/4FkmIzNarO5kF+eeQo6iw4jNmqc7yYLiNZQ30Z
TNmV4cmsROxHwm5vQBf7ccRDUWJ9A0FZCuEk2RjMT00GNaxCCtpmI2ysihslMRnw
8EhmnAsZ0abvL/s1MhYTZQ==
-----END PRIVATE KEY-----
Caching
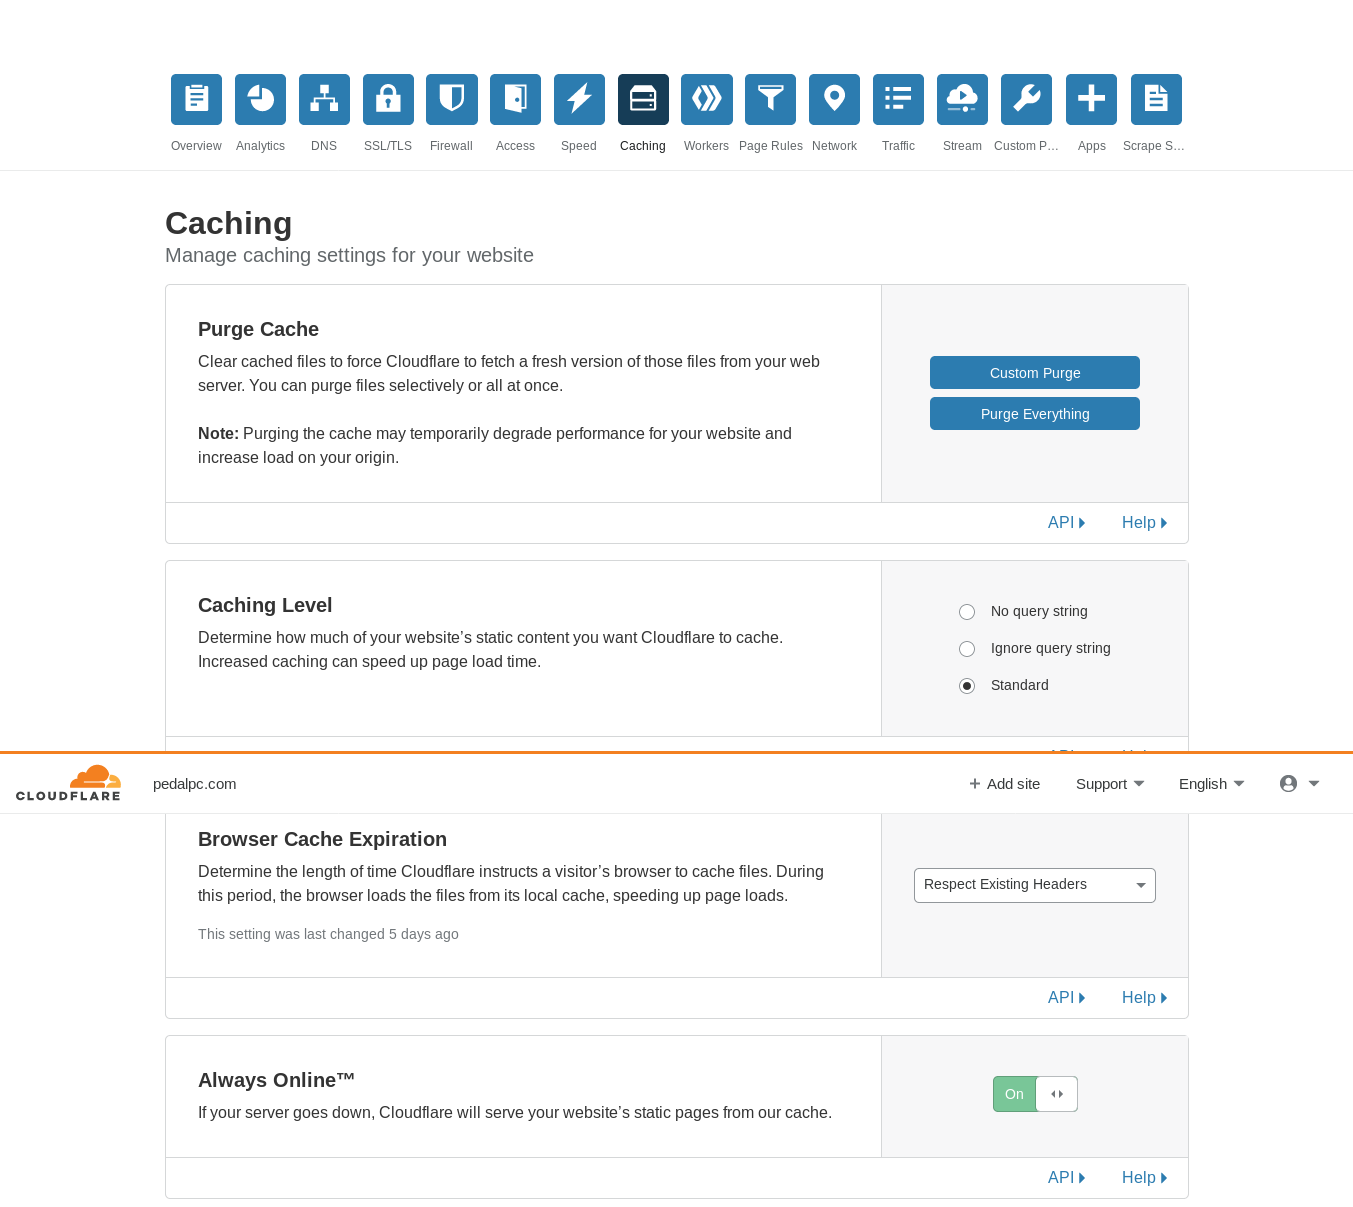
Go to the Caching section of your Cloudflare dashboard and set the "Caching Level" to "standard", "Browser Cache Expiration" to "Respect Existing Headers", and set "Always Online" to "On".
Page Rules
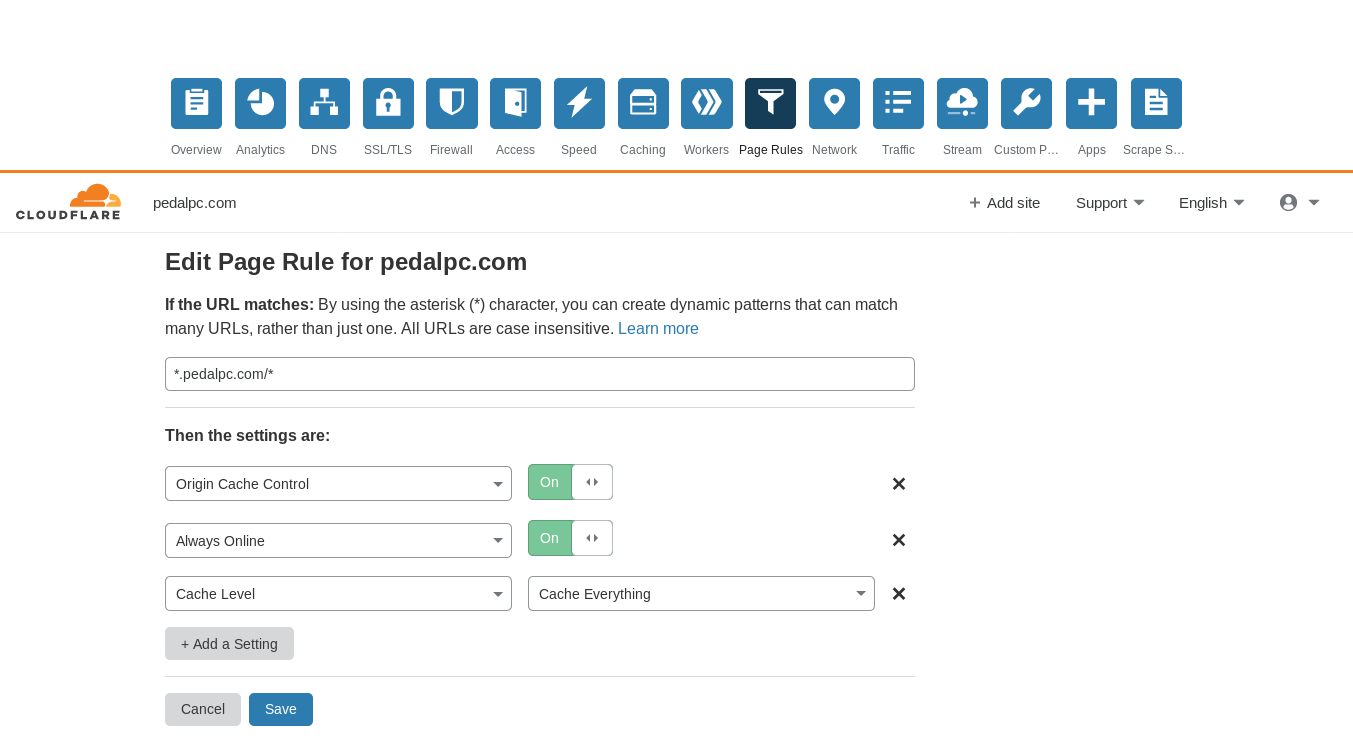
Finally, you need to tell Cloudflare what rules it should follow to cache your content. Cloudflare allows you to create up to 3 URL-based "page rules" on their free plan.
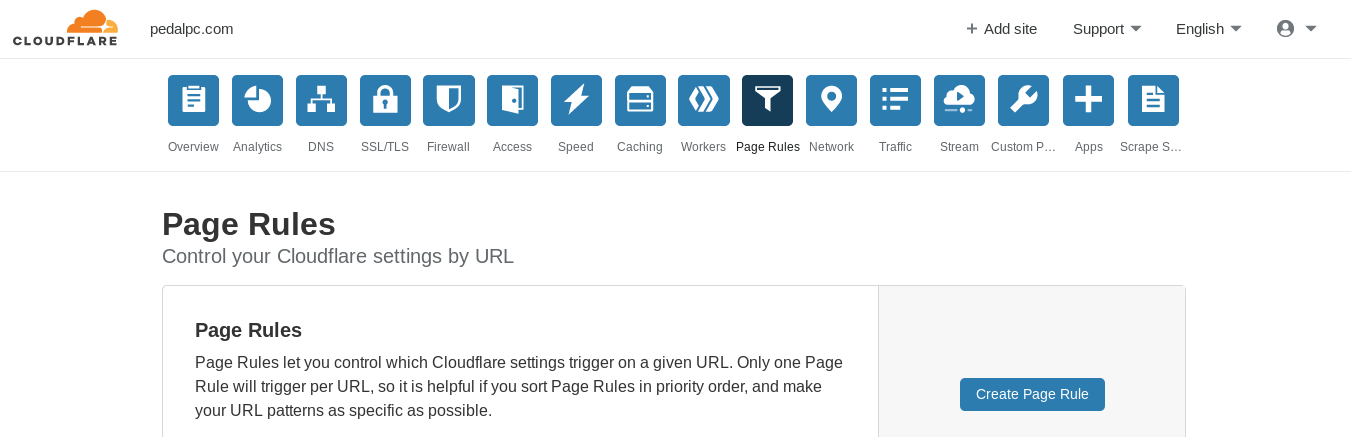
I created one wildcard-based URL that covered my entire domain, then set three settings for this rule:
- Always Online = "ON"
- Cache Level = "Everything"
- Origin Cache Control = "ON"
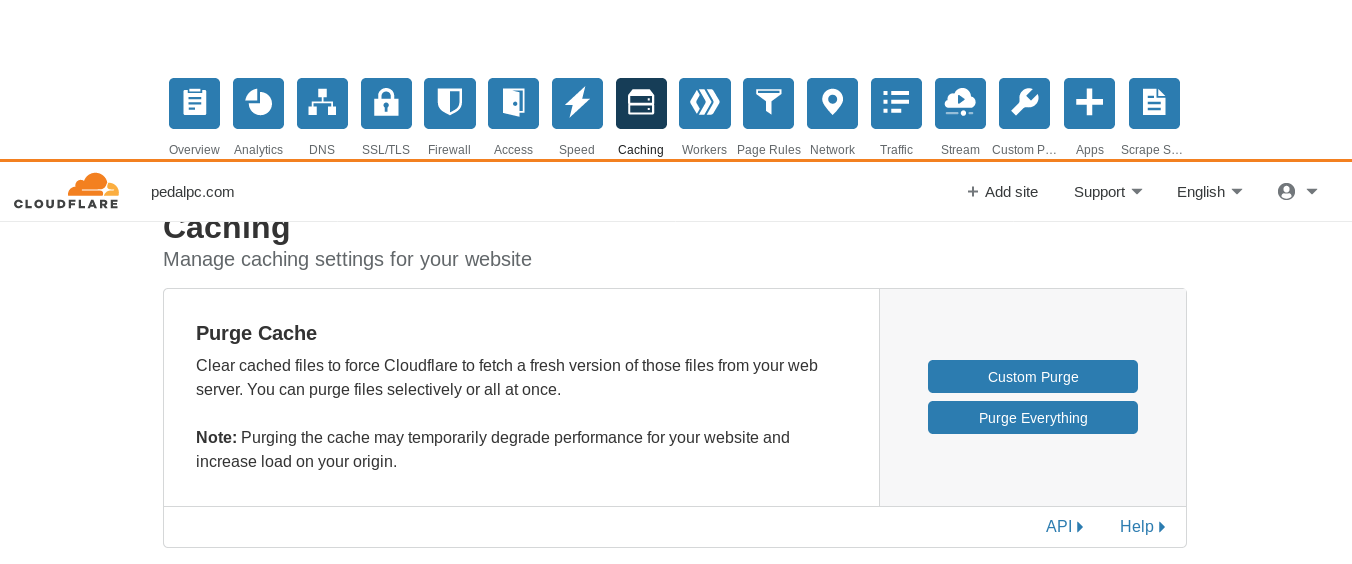
This tells Cloudflare to use your server headers to determine how to cache your site's content. To change cache settings, you only need to edit the settings in your /etc/nginx/sites-available/mysite.conf file, reload the server using sudo nginx -s reload, then either wait for the cached content to expire or manually purge the effected URL(s) in Cloudflare's cache, using the dashboard section shown below:
Authenticated Origin Pulls
This is an extra security measure to prevent anyone from trying to access your content outside of Cloudflare. You can learn more about it here.
Run the following command to install Cloudflare's certificate on your server:
$ sudo mkdir /etc/nginx/certs && cd $_
$ sudo wget -O cloudflare.crt https://support.cloudflare.com/hc/en-us/article_attachments/201243967/origin-pull-ca.pem
The Nginx configuration file listed in the top of this tutorial already is configured to use AOP.
Change Your Router Settings
You will want to configure your router's firewall to only pass traffic through from Cloudflare IP addresses, the same ones you used previously when setting up UFW. On my router the settings are under Advanced > Filtering Options > IP/Port Filter:
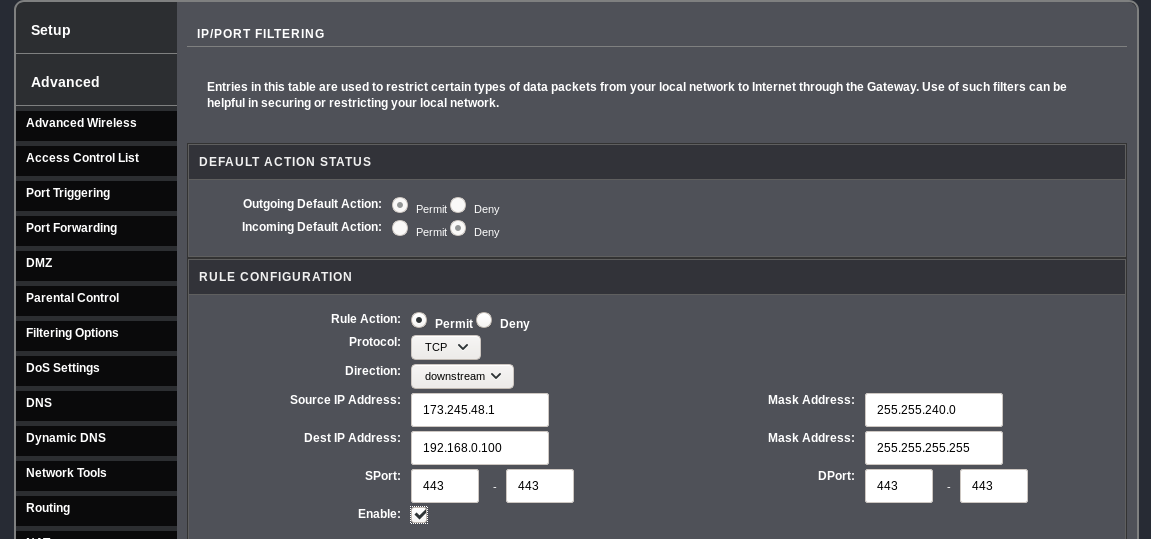
You will need a rule for each Cloudflare IP address block. The destination address will be the static address you assigned to your server in the step above.
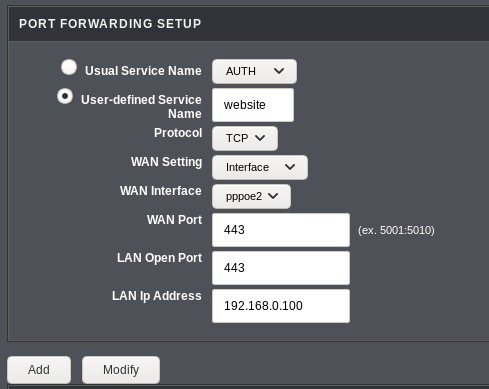
On my router, I also had to port forward all incoming traffic on 443 to my server to make this work:
Set Up Dynamic IP address script
Get your Global API token from the dash profile page and enter it along with your other account settings at the top of the script below:
$ cat ~/.local/bin/update_cloudflare_dns.sh
#! /bin/bash
# -- account settings
AUTH_EMAIL="[email protected]"
AUTH_KEY="XXXXXXXXXXXXXXXXXXXXXXXXXXXXXXXXXXXXX"
DOMAIN="mysite.com"
# -- end account settings
IP_LOG=/var/log/ip.log
ERROR_LOG=/var/log/cloudflare.log
NEW_IP=$(dig +short myip.opendns.com @resolver1.opendns.com)
if [ -f ${IP_LOG} ]; then
    OLD_IP=$(cat ${IP_LOG})
else
    OLD_IP=''
fi
# echo "IP is ${NEW_IP}, it was ${OLD_IP} last check."
if [ "${NEW_IP}" != "${OLD_IP}" ]; then
    # need zone ID & DNS ID to change DNS
    ZONE_ID=$(curl -q -X GET "https://api.cloudflare.com/client/v4/zones" \
        -H "X-Auth-Email: ${AUTH_EMAIL}" \
        -H "X-Auth-Key: ${AUTH_KEY}" \
        -H "Content-Type: application/json" | grep -Po '(?<="id":")[^"]*' | head -n 1)
    echo ${ZONE_ID}
    DNS_ID=$(curl -q -X GET "https://api.cloudflare.com/client/v4/zones/${ZONE_ID}/dns_records?type=A&name=${DOMAIN}" \
        -H "X-Auth-Email: ${AUTH_EMAIL}" \
        -H "X-Auth-Key: ${AUTH_KEY}" \
        -H "Content-Type: application/json" | grep -Po '(?<="id":")[^"]*')
    echo ${DNS_ID}
    # now the DNS can finally be updated!
    RESULT=$(curl -q -X PUT "https://api.cloudflare.com/client/v4/zones/${ZONE_ID}/dns_records/${DNS_ID}" \
        -H "X-Auth-Email: ${AUTH_EMAIL}" \
        -H "X-Auth-Key: ${AUTH_KEY}" \
        -H "Content-Type: application/json" \
        --data "{\"type\":\"A\",\"name\":\"${DOMAIN}\",\"content\":\"$NEW_IP\",\"proxied\":true}")
    #echo $RESULT
    if [[ $RESULT == *"\"success\":false"* ]]; then
        message="API UPDATE FAILED. DUMPING RESULTS:\n${RESULT}"
        echo -e "$message" >> ${ERROR_LOG}
        exit 1
    else
        message="IP changed to: ${NEW_IP}"
        echo "${NEW_IP}" > ${IP_LOG}
        echo "$message"
        exit 0
    fi
else
    echo "IP has not changed."
fi
Run the script once to update your DNS with Cloudflare (the IP address you receive will be different):
$ update_cloudflare_dns.sh
IP changed to: 111.222.333.444
Edit your server's crontab using crontab -e and add the following rules to update Cloudflare with your server's current IP address every 15 minutes:
# -- update DNS IP address for website
#@reboot /home/myaccount/.local/bin/update_cloudflare_dns.sh
*/4 * * * * /home/myaccount/.local/bin/update_cloudflare_dns.sh
You'll notice I wanted the script to run at boot, too, but that won't work from here--your server usually hasn't established a network connection yet. Instead, you can create a systemd service that will launch at boot after your server is online. To do this, create a systemd service file
$ cat /etc/systemd/system/cloudflare.service
[Unit]
Description=Update IP address in Cloudflare's DNS records
After=network.target network-online.target

[Service]
Type=oneshot
ExecStart=/home/myaccount/.local/bin/update_cloudflare_dns.sh

[Install]
WantedBy=multi-user.target
Enable the service after you create the file
$ sudo systemctl enable cloudflare
You can see its status:
$ sudo systemctl status cloudflare
● cloudflare.service - Update IP address in Cloudflare's DNS records
   Loaded: loaded (/etc/systemd/system/cloudflare.service; enabled; vendor preset: e
   Active: inactive (dead) since Fri 2019-11-29 07:04:56 CST; 8s ago
  Process: 18188 ExecStart=/home/myaccount/.local/bin/update_cloudflare_dns.sh (code=exite
 Main PID: 18188 (code=exited, status=0/SUCCESS)

Nov 29 07:04:56 mywebserver systemd[1]: Starting Update IP address in Cloudflare'
Nov 29 07:04:56 mywebserver update_cloudflare_dns.sh[18188]: IP changed to: 111:222:333:444.
Nov 29 07:04:56 mywebserver systemd[1]: cloudflare.service: Succeeded.
Nov 29 07:04:56 mywebserver systemd[1]: Started Update IP address in Cloudflare's
That's it. Your website should now be visible using Cloudflare.
Check Your Logs
Server log
To make sure everything is working, visit your website in a web browser, then check your web server's access logs. You should see something like this:
$ sudo tail /var/log/nginx/access.log
162.158.74.191 - - [29/Nov/2019:07:13:33 -0600] "GET / HTTP/1.1" 200 633 "-" "Mozilla/5.0 (X11; Linux aarch64; rv:60.0) Gecko/20100101 Firefox/60.0"
Each line in the access log is one visit to your site. The default format for each record is as follows:
<source IP address of the request> <remote user> - [local time of request] "<request>" <status code> <length of content returned in bytes> "<referring URL>" "<user agent string>"
A few things to note:
-
The source IP address should never be outside of the range of Cloudflare's IPs or your LAN. If so, your firewalls are not working.
-
The
<request>field includes both the type of request (GET, POST) and the requested URL (in this case, '/' indicates the root URL for the site, www.pedalpc.com/). -
The
<status code>is the response code supplied by the server. Common codes are:- 200 - OK (page retrieved successfully)
- 301 - permanent redirect to another URL
- 302 - temporary redirect to another URL
- 403 - forbidden (not allowed to access this page)
- 404 - page not found or doesn't exist
- 500 - something is wrong with the server
Check occasionally for 404's errors in your log. They can occur because of misspelled URLs in links on your site or from referring sites, or because of URL changes you've made. In the latter two cases, you should add the requested URL to the list of 301 URLs in your Nginx conf file so the requests are redirected to the right URL, then restart the server with
sudo nginx -S reload. -
The
<referring URL>is usually "-", which means no referring page. This could be because the URL was typed directly in the browser (like in this case), but more often its due to bots spidering your site. -
You can often tell from the
<user agent string>who is visiting your site. Most often, it will be bots (Googlebot, Twitterbot, etc.) Cloudflare has their own special user-agent strings, depending on the purpose of the crawl:-
When you have
"Always On"set to "on", Cloudflare will scan your site every two weeks to fill their cache; it usesMozilla/5.0 (compatible; Cloudflare AlwaysOnline/1.0;+http://www.cloudflare.com/always-onlinewhen it does. -
When it is conducting a speed test to measure performance improvements of your site, it uses
Mozilla/5.0 (X11; Linux x86_64) AppleWebKit/537.36 (KHTML, like Gecko) Chrome/75.0.3770.100 Safari/537.36 PTST/190628.140653.
-
UFW log
If your router's firewall is working, you should only see blocks in your router's firewall log (if it has one) and never anything in the UFW log. If it's not working, or if you're unable to enable it, you will see entries like this:
$ sudo tail /var/log/ufw.log
Dec  3 03:39:23 oppcp-1 kernel: [63410.544660] [UFW BLOCK] IN=wlan1 OUT= MAC=41:73:c7:d2:50:e1:9a:7b:a1:19:c1:f3:33:00 SRC=92.118.160.21 DST=192.168.0.101 LEN=44 TOS=0x00 PREC=0x00 TTL=245 ID=6832 PROTO=TCP SPT=49956 DPT=443 WINDOW=1024 RES=0x00 SYN URGP=0
Dec  3 03:46:38 oppcp-1 kernel: [63845.095387] [UFW BLOCK] IN=wlan1 OUT= MAC=41:73:c7:d2:50:e1:9a:7b:a1:19:c1:f3:33:00 SRC=193.56.28.116 DST=192.168.0.101 LEN=40 TOS=0x00 PREC=0x00 TTL=244 ID=21249 PROTO=TCP SPT=46225 DPT=443 WINDOW=1024 RES=0x00 SYN URGP=0
Dec  3 04:49:21 oppcp-1 kernel: [67607.981461] [UFW BLOCK] IN=wlan1 OUT= MAC=41:73:c7:d2:50:e1:9a:7b:a1:19:c1:f3:33:00 SRC=138.246.253.5 DST=192.168.0.101 LEN=40 TOS=0x00 PREC=0x00 TTL=242 ID=54321 PROTO=TCP SPT=48546 DPT=443 WINDOW=65535 RES=0x00 SYN URGP=0
[1]: I am currently 55 years old, a period in life when a person's power output normally [steeply declines](https://physoc.onlinelibrary.wiley.com/doi/full/10.1113/jphysiol.2007.141879). It's likely my surplus output will decrease going forward. If so, I will either need to pedal more each day to compensate, or use more efficient equipment so I have more surplus electricity to save. Otherwise, I won't be able to generate enough electricity each day to keep this site up!